Magento 2: Tworzenie grida w adminie za pomocą komponentu UI
W Magento 2 tworzenie grida w adminie na można dokonać na dwa sposoby:
- W stylu Magento 1 (wykorzystanie odpowiednich bloków, przykład modułu Magento_Newsletter),
- Za pomocą komponentów UI.
W tym wpisie pokażę jak stworzyć grida w adminie za pomocą komponentu UI.
Wstęp
W poprzednich wpisach powstał moduł Anna_Guestbook, oto ich lista:
- Tworzenie Modeli CRUD,
- Wpisy na temat tworzenia tabel za pomocą skrptów jak i db_schema.xml.
Ponieważ to jest kontynuacja tematu, tutaj stworzymy nowy moduł Anna_GuestbookAdminUI. W pliku etc/module.xml zaznaczmy, że jest on zależny od modułu Anna_Guestbook:
|
1 2 3 4 5 6 7 8 9 |
<?xml version="1.0"?> <config xmlns:xsi="http://www.w3.org/2001/XMLSchema-instance" xsi:noNamespaceSchemaLocation="urn:magento:framework:Module/etc/module.xsd"> <module name="Anna_GuestbookAdminUI"> <sequence> <module name="Anna_Guestbook" /> </sequence> </module> </config> |
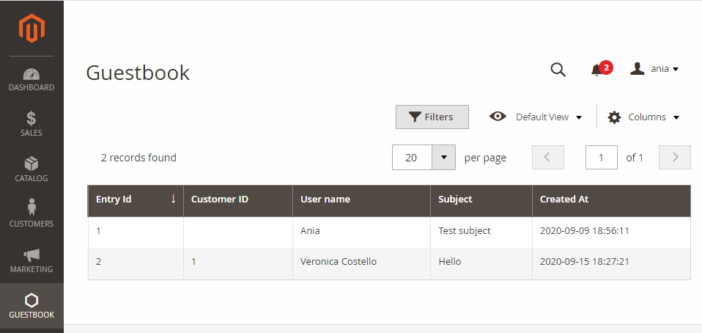
Na potrzeby tego wpisu, stworzymy minimalistyczną wersję grida dla wpisów do księgi gości.

Utworzenie reguł ACL i menu
Pierwszym krokiem będzie utworzenie reguł acl i w zależności od potrzeb, zdefiniowanie odpowiedniej konfiguracji dla menu.
Plik etc/acl.xml, na potrzeby samego grida, jest następujący:
|
1 2 3 4 5 6 7 8 9 10 11 12 13 |
<?xml version="1.0"?> <config xmlns:xsi="http://www.w3.org/2001/XMLSchema-instance" xsi:noNamespaceSchemaLocation="urn:magento:framework:Acl/etc/acl.xsd"> <acl> <resources> <resource id="Magento_Backend::admin"> <resource id="Anna_GuestbookAdminUI::guestbook" title="Guestbook" translate="title" sortOrder="40"> <resource id="Anna_GuestbookAdminUI::manage" title="All Entries" translate="title" sortOrder="10"/> </resource> </resource> </resources> </acl> </config> |
Następnie kokiem jest dodanie menu i odniesienie się do zdefiniowanych wartości acl:
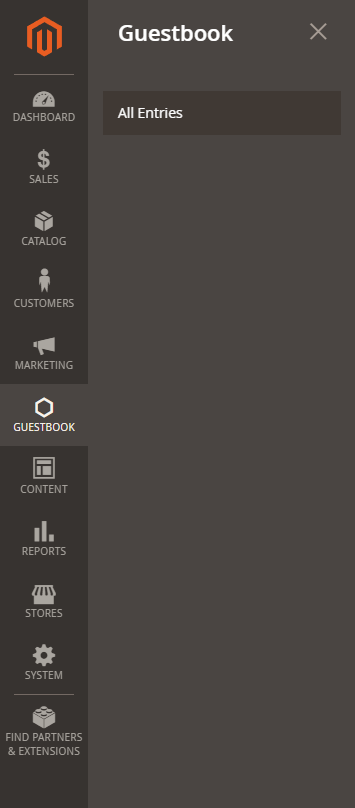
Dodanie takiego menu zrobimy, tworząc plik w etc/adminhtml/menu.xml o takiej zawartości:
|
1 2 3 4 5 6 7 8 9 10 11 12 13 14 15 16 17 18 19 20 21 |
<?xml version="1.0"?> <config xmlns:xsi="http://www.w3.org/2001/XMLSchema-instance" xsi:noNamespaceSchemaLocation="urn:magento:module:Magento_Backend:etc/menu.xsd"> <menu> <add id="Anna_GuestbookAdminUI::guestbook" title="Guestbook" module="Anna_GuestbookAdminUI" sortOrder="40" resource="Anna_GuestbookAdminUI::guestbook" /> <add id="Anna_GuestbookAdminUI::manage" title="All Entries" module="Anna_GuestbookAdminUI" sortOrder="10" parent="Anna_GuestbookAdminUI::guestbook" action="guestbook/index/index" resource="Anna_GuestbookAdminUI::manage" /> </menu> </config> |
Określiłam tutaj, że ścieżka do akcji będzie następująca: guestbook/index/index.
Definicja routingu i akcji kontrolera
W etc/adminhtml utwórz plik routes.xml, aby ustawić frontname dla tego modułu:
|
1 2 3 4 5 6 7 8 9 |
<?xml version="1.0"?> <config xmlns:xsi="http://www.w3.org/2001/XMLSchema-instance" xsi:noNamespaceSchemaLocation="urn:magento:framework:App/etc/routes.xsd"> <router id="admin"> <route id="guestbook" frontName="guestbook"> <module name="Anna_GuestbookAdminUI" /> </route> </router> </config> |
Dodawanie routingu w adminie i tworzenie menu zostało szerzej omówione w tym wpisie.
Następnie zdefiniujmy klasę akcji Index, w podkatalogu Controller/Adminhtml/Index:
|
1 2 3 4 5 6 7 8 9 10 11 12 13 14 15 16 17 18 19 20 21 22 23 24 25 26 27 28 29 30 31 32 33 34 35 36 37 38 39 40 41 42 43 44 45 46 47 48 49 50 51 52 53 54 55 56 57 58 59 60 61 62 63 |
<?php declare(strict_types=1); namespace Anna\GuestbookAdminUI\Controller\Adminhtml\Index; use Magento\Backend\App\Action; use Magento\Backend\Model\View\Result\ForwardFactory; use Magento\Framework\App\Action\HttpGetActionInterface; use Magento\Framework\App\ResponseInterface; use Magento\Framework\Controller\ResultInterface; use Magento\Framework\View\Result\Page; use Magento\Framework\View\Result\PageFactory; class Index extends Action implements HttpGetActionInterface { /** * Authorization level of a basic admin session * * @see _isAllowed() */ const ADMIN_RESOURCE = 'Anna_GuestbookAdminUI::manage'; /** * @var ForwardFactory */ protected $resultForwardFactory; /** * @var PageFactory */ protected $resultPageFactory; public function __construct( Action\Context $context, ForwardFactory $resultForwardFactory, PageFactory $resultPageFactory ) { parent::__construct($context); $this->resultForwardFactory = $resultForwardFactory; $this->resultPageFactory = $resultPageFactory; } /** * @return ResponseInterface|ResultInterface|Page */ public function execute() { if ($this->getRequest()->getQuery('ajax')) { $resultForward = $this->resultForwardFactory->create(); $resultForward->forward('grid'); return $resultForward; } $resultPage = $this->resultPageFactory->create(); $resultPage->setActiveMenu('Anna_GuestbookAdminUI::index'); $resultPage->getConfig()->getTitle()->prepend(__('Guestbook')); return $resultPage; } } |
Wyróżniona linijka przedstawia ustawienie reguły acl. W Magento 1 przyjęło się, że w klasie dziedziczącej nadpisuje się metodę _isAllowed(). W Magento 2 wystarczy, jeśli nie mamy bardziej rozbudowanej logiki, że nadpiszemy stałą ADMIN_RESOURSE.
Konfiguracja layoutu dla grida
Kolejnym krokiem jest utworzenie konfiguracji layoutu, w podkatalogu view/adminhtml/layout potrzebujemy dodać plik guestbook_index_index.xml:
|
1 2 3 4 5 6 7 8 9 10 |
<?xml version="1.0"?> <page xmlns:xsi="http://www.w3.org/2001/XMLSchema-instance" xsi:noNamespaceSchemaLocation="urn:magento:framework:View/Layout/etc/page_configuration.xsd"> <update handle="formkey"/> <body> <referenceContainer name="content"> <uiComponent name="guestbook_listing" /> </referenceContainer> </body> </page> |
W konfiguracji określiliśmy uiComponent o nazwie guestbook_listing, która odnosi się do nazwy konfiguracyjnego pliku xml.
Ogólnie, kiedy tworzymy konfigurację dla grida, to mamy plik view/adminhtml/ui_component/*_listing.xml, to jego definicja wygląd tak:
|
1 2 3 4 5 6 7 8 9 10 11 12 13 14 15 16 17 18 19 20 21 22 23 24 25 26 27 |
<?xml version="1.0" ?> <listing xmlns:xsi="http://www.w3.org/2001/XMLSchema-instance" xsi:noNamespaceSchemaLocation="urn:magento:module:Magento_Ui:etc/ui_configuration.xsd"> <argument name="data" xsi:type="array"> <item name="js_config" xsi:type="array"> <item name="provider" xsi:type="string">*_listing.*_listing_data_source</item> </item> </argument> <settings> <!-- ... --> <deps> <dep>*_listing.*_listing_data_source</dep> </deps> </settings> <dataSource component="Magento_Ui/js/grid/provider" name="*_listing_data_source"> <settings> <updateUrl path="mui/index/render"/> </settings> <aclResource>{Namespace}_{Module}::{resource_id}</aclResource> <dataProvider class="Magento\Framework\View\Element\UiComponent\DataProvider\DataProvider" name="*_listing_data_source"> <settings> <requestFieldName>id</requestFieldName> <primaryFieldName>id</primaryFieldName> </settings> </dataProvider> </dataSource> <!-- ... --> </listing> |
Ważnym elementem, którym potrzebujemy się zainteresować jest komponent dataSource. Umożliwia on interakcję z danymi w twoim komponencie UI. W dalszej części wyjaśnimy sobie również jak przekazać dane do komponentów.
Dla tworzonego tutaj przykładu modułu potrzebujemy stworzyć konfigurację dla komponentu ui w pliku view/adminhtml/ui_component/guestbook_listing.xml:
|
1 2 3 4 5 6 7 8 9 10 11 12 13 14 15 16 17 18 19 20 21 22 23 24 25 26 27 28 29 30 31 32 33 34 35 36 37 38 39 40 41 42 43 44 45 46 47 48 49 50 51 52 53 54 55 56 57 58 59 60 61 62 63 64 65 66 67 68 69 70 71 72 |
<?xml version="1.0" encoding="UTF-8"?> <listing xmlns:xsi="http://www.w3.org/2001/XMLSchema-instance" xsi:noNamespaceSchemaLocation="urn:magento:module:Magento_Ui:etc/ui_configuration.xsd"> <argument name="data" xsi:type="array"> <item name="js_config" xsi:type="array"> <item name="provider" xsi:type="string">guestbook_listing.guestbook_listing_data_source</item> </item> </argument> <settings> <spinner>guestbook_columns</spinner> <deps> <dep>guestbook_listing.guestbook_listing_data_source</dep> </deps> </settings> <dataSource name="guestbook_listing_data_source" component="Magento_Ui/js/grid/provider"> <settings> <storageConfig> <param name="indexField" xsi:type="string">entry_id</param> </storageConfig> <updateUrl path="mui/index/render"/> </settings> <aclResource>Anna_GuestbookAdminUI::manage</aclResource> <dataProvider class="Magento\Framework\View\Element\UiComponent\DataProvider\DataProvider" name="guestbook_listing_data_source"> <settings> <requestFieldName>entry_id</requestFieldName> <primaryFieldName>entry_id</primaryFieldName> </settings> </dataProvider> </dataSource> <listingToolbar name="listing_top"> <settings> <sticky>true</sticky> </settings> <bookmark name="bookmarks"/> <columnsControls name="columns_controls"/> <filters name="listing_filters"/> <paging name="listing_paging"/> </listingToolbar> <columns name="guestbook_columns" class="Magento\Ui\Component\Listing\Columns"> <column name="entry_id" sortOrder="20"> <settings> <filter>textRange</filter> <label translate="true">Entry Id</label> <sorting>asc</sorting> </settings> </column> <column name="customer_id" sortOrder="30"> <settings> <filter>text</filter> <label translate="true">Customer ID</label> </settings> </column> <column name="user_name" sortOrder="40"> <settings> <filter>text</filter> <label translate="true">User name</label> </settings> </column> <column name="subject" sortOrder="50"> <settings> <filter>text</filter> <label translate="true">Subject</label> </settings> </column> <column name="created_at" sortOrder="60"> <settings> <filter>text</filter> <label translate="true">Created At</label> </settings> </column> </columns> </listing> |
Dodatkowo w przykładzie mamy takie elementy jak:
- listingToolbar — stanowi on kontener dla elementów listingu takich jak paginacja, masowe akcje, filtry, zakładki,
- columns — komponent ten odpowiada za listę kolumn. Jego zadaniem jest wyrenderowanie elementu <table> i wyświetlenie rekordów komponentu listingu w tej tabeli.
Potrzebujemy jeszcze dostarczyć dane do komponentu. Ponieważ przykład jest standardowy, nie będziemy dodawać nowych klas, tylko stworzymy w tym celu odpowiednią konfigurację w pliku di.xml.
Konfiguracja di.xml
Robiąc konfigurację di.xml dla listingu, należy umieścić ją w obszarze globalnym.
Uwaga! Nie definiujemy jej w di.xml znajdującym się w katalogu etc/adminhtml. Jeśli umieścimy poniższą konfigurację w adminhtml, na wszystkich listingach, gdzie wyświetlane są gridy, pojawi się błąd „Not Registered Handle„!
Wróćmy do naszego przykładu. Nasz etc/di.xml, konfigurujący dane do komponentu UI jest następujący:
|
1 2 3 4 5 6 7 8 9 10 11 12 13 14 15 16 17 18 19 20 21 |
<?xml version="1.0"?> <config xmlns:xsi="http://www.w3.org/2001/XMLSchema-instance" xsi:noNamespaceSchemaLocation="urn:magento:framework:ObjectManager/etc/config.xsd"> <virtualType name="Anna\GuestbookAdminUI\Model\ResourceModel\Guestbook\Grid\Collection" type="Magento\Framework\View\Element\UiComponent\DataProvider\SearchResult"> <arguments> <argument name="mainTable" xsi:type="string">guestbook</argument> <argument name="resourceModel" xsi:type="string">Anna\Guestbook\Model\ResourceModel\Guestbook</argument> </arguments> </virtualType> <type name="Magento\Framework\View\Element\UiComponent\DataProvider\CollectionFactory"> <arguments> <argument name="collections" xsi:type="array"> <item name="guestbook_listing_data_source" xsi:type="string">Anna\GuestbookAdminUI\Model\ResourceModel\Guestbook\Grid\Collection</item> </argument> </arguments> </type> </config> |
Po pierwsze, potrzebujemy zdefiniować klasę kolekcji dla grida. Utworzona klasa kolekcji powinna dziedziczyć po klasie Magento\Framework\View\Element\UiComponent\DataProvider\SearchResult, następnie konfigurujemy jakie argumenty do konstruktora powinna przyjmować ta klasa. Dzięki konfiguracji z <virtualType> nie musimy ręcznie tworzyć tej klasy. Argumenty, które tu konfigurujemy:
- mainTable — jak nazwa wskazuje, nazwa głównej, podstawowej tabeli, z której otrzymujemy dane.
- resourceModel — podajemy ścieżkę do klasy resource głównej tabeli. Podawana jest tutaj podstawowa klasa Resource, a nie ta do obsługi kolekcji.
Klasa providera korzysta z klasy fabryki Magento\Framework\View\Element\UiComponent\DataProvider\CollectionFactory, która odpowiednio skonfigurowana zwróci nam odpowiednią kolekcję przy jej wywoływaniu. Zdefiniowana tutaj konfiguracja doda do tablicy collections nowy element, o indeksie „guestbook_listing_data_source” oraz wartości jako klasa Anna\GuestbookAdminUI\Model\ResourceModel\Guestbook\Grid\Collection.
Jakie zapytanie pobiera dane do grida?
W celu zdebugowania jakie zapytanie pobiera dane dla grida, potrzebujemy sprawdzić klasę Magento\Framework\View\Element\UiComponent\DataProvider\DataProvider. Interesuje nas metoda getSearchResult():
|
1 2 3 4 5 6 7 8 9 |
/** * Returns Search result * * @return SearchResultInterface */ public function getSearchResult() { return $this->reporting->search($this->getSearchCriteria()); } |
Zmienna klasowa $reporting odnosi się do klasy Magento\Framework\View\Element\UiComponent\DataProvider\Reporting:
|
1 2 3 4 5 6 7 8 9 10 11 12 13 14 15 16 17 18 19 20 21 22 23 24 25 26 27 28 29 30 31 32 33 34 35 36 37 38 39 40 41 42 43 44 45 46 47 48 49 50 51 52 53 54 55 56 |
<?php /** * Copyright © Magento, Inc. All rights reserved. * See COPYING.txt for license details. */ namespace Magento\Framework\View\Element\UiComponent\DataProvider; use Magento\Framework\Api\Search\ReportingInterface; use Magento\Framework\Api\Search\SearchCriteriaInterface; use Magento\Framework\Api\Search\SearchResultInterface; /** * Class Reporting */ class Reporting implements ReportingInterface { /** * @var CollectionFactory */ protected $collectionFactory; /** * @var array */ protected $filterPool; /** * @param CollectionFactory $collectionFactory * @param FilterPool $filterPool */ public function __construct( CollectionFactory $collectionFactory, FilterPool $filterPool ) { $this->collectionFactory = $collectionFactory; $this->filterPool = $filterPool; } /** * @param SearchCriteriaInterface $searchCriteria * @return SearchResultInterface */ public function search(SearchCriteriaInterface $searchCriteria) { $collection = $this->collectionFactory->getReport($searchCriteria->getRequestName()); $collection->setPageSize($searchCriteria->getPageSize()); $collection->setCurPage($searchCriteria->getCurrentPage()); $this->filterPool->applyFilters($collection, $searchCriteria); foreach ($searchCriteria->getSortOrders() as $sortOrder) { if ($sortOrder->getField()) { $collection->setOrder($sortOrder->getField(), $sortOrder->getDirection()); } } return $collection; } } |
Tworzenie formularza w adminie za pomocą komponentu UI w Magento 2 - Web Porgramming
21 września 2023 @ 12:47
[…] poprzednim wpisie został utworzony moduł Anna_GuestbookAdminUI, w którym dodano stronę w adminie wyświetlającą […]
Magento 2: Jak moduł oddziałuje z innymi modułami? - Web Programming
30 października 2023 @ 17:18
[…] mamy dwa moduły o nazwie Anna_GuestbookAdminUI oraz Anna_Guestbook. Żeby określić, że moduł Anna_GuestbookAdminUI jest zależny od modułu […]
Magento 2: manipulowanie wstrzykiwanymi zależnościami do klas za pomocą type i virtualType - Web Programming
31 października 2023 @ 01:24
[…] Przykład pochodzi z moduła Magento_Search, z pliku vendor/magento/module-search/etc/di.xml. Takie typ konfiguracji został omówiony szerzej w tej notce. […]